

Isosceles vs Weaver vs Chapman: Key Differences Explained
Understanding the distinctions between the Isosceles, Weaver, and Chapman shooting stances is essential for both new and experienced shooters. Each stance has unique characteristics, advantages, and limitations that cater to different shooting styles, physical builds, and scenarios. Below is an in-depth exploration of the key differences between these three foundational techniques.
The Isosceles Stance
The Isosceles stance is named after the geometric triangle it mimics when viewed from above. This modern approach to shooting emphasizes simplicity and stability.
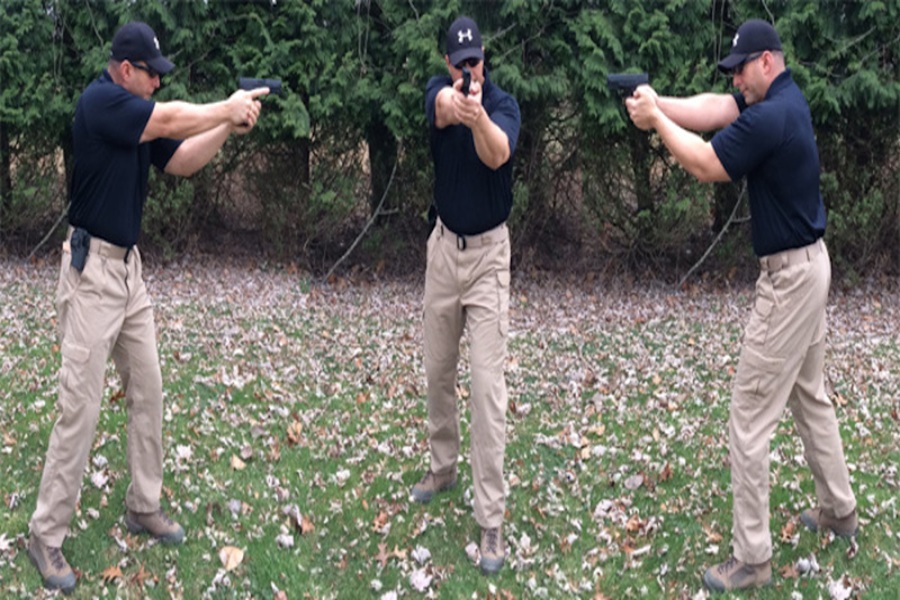
Key Features: – Arm Position: Both arms are extended forward equally, creating a symmetrical “V” shape. – Foot Positioning: Feet are placed shoulder-width apart, squared towards the target. – Body Alignment: Shoulders and hips face forward directly at the target for maximum stability.
Advantages: – Offers excellent recoil control due to even weight distribution. – Simplifies aiming by keeping movements aligned with the target. – Works well with modern body armor setups as it maintains full front-facing coverage.
Drawbacks: – More difficult to maintain during movement or in uneven terrain. – May feel unnatural for those accustomed to bladed or angled stances.
The Weaver Stance
Developed by Jack Weaver in the mid-20th century, this stance is a “bladed” technique that combines strong arm support with a slightly angled body position. It remains popular among traditionalists and law enforcement.
Key Features: – Arm Position: The dominant arm extends fully while the support arm bends slightly downward at the elbow for added tension. – Foot Positioning: Feet are staggered, with one foot ahead of the other (reminiscent of a boxer’s stance). – Body Alignment: The torso remains at an angle to reduce exposure while offering balance during movement.
Advantages: – Reduces shooter profile when facing an adversary. – Creates natural tension between arms for improved weapon stability. – Allows greater mobility compared to some other stances.
Drawbacks: – Can be harder to master due to its asymmetry. – Some users report increased fatigue in the supporting arm during extended use.
The Chapman Stance
Also referred to as a “Modified Weaver,” this technique was created by Ray Chapman as an evolution of its predecessor. It incorporates elements of both stances while emphasizing comfort and precision.
Key Features: – Arm Position: Similar to Weaver—dominant arm extends fully—but uses less tension in supporting arm muscles. – Foot Positioning: Feet remain staggered like in the Weaver stance but offer more flexibility based on shooter preference. – Body Alignment: While angled slightly like Weaver, shoulders are squared toward the target for better alignment.
Advantages: – Combines recoil control from Isosceles with maneuverability of Weaver. – Reduces strain on muscles compared to traditional Weaver stance techniques.
Drawbacks: – Its hybrid nature may take time for beginners seeking consistency during practice sessions
| Feature | Isosceles | Weaver | Chapman |
| Arm Position | Both arms fully extended symmetrically | Strong-arm straight; support bent | Strong-arm straight; relaxed support |
| Foot Placement | Shoulder-width apart | Staggered (bladed) | Staggered (moderate angle) |
Which Shooting Stance Is Best for Accuracy and Control
When it comes to improving both accuracy and control in shooting, the stance you choose can make a significant difference. Each of the three primary stances—Isosceles, Weaver, and Chapman—comes with its strengths and situational advantages. This section offers a detailed look at how these stances compare in terms of precision, stability, and adaptability.
Evaluating Accuracy Across the Stances
- Offers excellent symmetry as both arms are extended equally forward.
- Reduces lateral movement because the body squares up directly to the target.
- Ideal for quick acquisition of sight alignment due to its intuitive setup.
- Relies on a push-pull tension between the arms that helps manage recoil.
- Provides slightly less visibility because of the bladed body position but can still be accurate in experienced hands.
- Combines elements of both Isosceles and Weaver for a hybrid approach.
- Offers strong shoulder support from straightening out the dominant arm, which enhances precision for some shooters.
Control and Recoil Management
- Both arms evenly share recoil absorption.
- Tends to feel natural for modern shooters using semi-automatic firearms.
- May require additional core engagement to remain steady during extended sessions.
- Push-pull grip creates deliberate resistance against recoil forces.
- Works best when combined with proper grip pressure but can fatigue certain muscle groups over time.
- Dominant arm absorbs much of the recoil independently.
- Often considered more stable than Weaver due to less reliance on upper body strength.
Comparing Stability and Comfort
| Stance | Stability | Comfort (for prolonged use) |
| Isosceles | High | Moderate (requires good posture) |
| Weaver | Moderate | Good (less physically taxing) |
| Chapman | High (on dominant side) | Good (natural arm extension helps) |
Practical Applications: Matching Stances to Scenarios
The “best” stance depends heavily on your specific needs as a shooter. For example: – For target practice: The Isosceles stance is optimal due to its consistent accuracy across static shooting ranges. – For close-quarter defense or dynamic environments: The bladed profile of the Weaver adds versatility when moving or dealing with obstacles. – For long-range precision shooting: Many shooters prefer Chapman for its added stability through one extended arm.
By understanding how each stance impacts accuracy, control, and comfort, you can better tailor your technique based on personal preferences and situational demands.
Breaking Down the Top 3 Shooting Stances for Beginners
For those new to shooting, understanding and mastering the right stance is critical. The three most popular stances — Isosceles, Weaver, and Chapman — each offer distinct advantages and are suited to different preferences or scenarios. This section will provide a beginner-friendly breakdown of these stances, highlighting their core principles, strengths, and applicability.
1. The Isosceles Stance: Stability in Simplicity
The Isosceles stance is named after a triangle because your arms form this shape when extended toward the target. It’s often recommended for beginners due to its straightforward approach.
- Feet shoulder-width apart.
- Body squared to the target.
- Both arms fully extended forward with elbows locked.
- Ease of Learning: Its symmetry makes it intuitive for beginners.
- Recoil Management: With weight evenly distributed, absorbing recoil feels manageable.
- Adaptability: Works well for both stationary shooting and moving targets.
- Pro Tip for Beginners: Focus on keeping your head upright and your shoulders relaxed to avoid unnecessary fatigue during practice sessions.
2. The Weaver Stance: A Tactical Edge
The Weaver stance is known as a “classic” technique that emphasizes control through an asymmetrical posture. While it may require more practice to perfect, it offers benefits in certain scenarios.
- Strong-side foot placed slightly behind the weak-side foot at a natural angle (approximately 45 degrees).
- Strong arm extended toward the target while the supporting arm bends slightly at the elbow.
- Weight shifts slightly forward onto your lead leg.
- Improved Recoil Control: The push-pull grip (pushing with your dominant hand while pulling with your support hand) minimizes muzzle rise.
- Compact Profile: The angled body position makes you a smaller target in defensive situations.
- Pro Tip for Beginners: Start slow with this stance by practicing dry firing at home before transitioning to live fire on the range.
3. The Chapman Stance: A Hybrid Approach
Also referred to as “the Modified Weaver,” the Chapman stance combines elements of both Weaver and Isosceles stances to create a stable but flexible shooting position.
- Similar foot placement as Weaver (strong-side foot back).
- Dominant arm fully extends while supporting arm bends at an angle, providing control without sacrificing balance.
- Easier on Shoulder Joints:** Ideal for those who find it challenging to maintain locked elbows in an Isosceles stance. applicable
Isosceles Stance: Why It’s Popular Among Modern Shooters
The isosceles stance has emerged as one of the most widely adopted shooting positions in modern firearm training. With its symmetrical, straightforward design, it offers a blend of simplicity, stability, and adaptability that appeals to shooters of varying skill levels. Below, we’ll delve into why this stance has gained popularity and how it benefits contemporary shooters.
Key Features of the Isosceles Stance
- Symmetry: Both arms are extended equally, forming an almost perfect triangle with the chest as the base and arms as the sides.
- Squaring to the Target: The shooter faces perpendicular to their target with feet shoulder-width apart, offering maximum visibility of their surroundings.
- Weight Distribution: Weight is evenly distributed on both feet, providing solid balance for recoil management.
Why Modern Shooters Prefer It
- The isosceles stance is intuitive for beginners because it mimics natural body mechanics.
- New shooters often find this position easier to align with their line of sight compared to more angled stances like Weaver or Chapman.
- Symmetrical arm positioning helps absorb recoil effectively, allowing faster follow-up shots during rapid fire or defensive scenarios.
- Combining this with a firm grip reduces muzzle rise significantly.
- Facing straight toward your target keeps your field of view broad and unobstructed.
- This situational awareness is particularly valuable in defensive shooting or competitive environments where multiple targets may be present.
- The rise in semi-automatic pistols as primary handguns complements this stance well. Firearms designed for two-handed grip function optimally when used in positions like the isosceles.
Practical Tips for Mastering This Stance
- Grip Strength Matters: Practice maintaining a strong two-handed grip without creating tension in your shoulders or wrists.
- Engage Your Core: Slight forward lean at the hips will help you stabilize against recoil forces.
- Check Your Footing: Ensure feet are spaced shoulder-width apart with knees slightly bent for flexibility and shock absorption.
- Dry Practice Drills: Use unloaded firearms to regularly practice transitioning into this stance quickly under different conditions.
| Component | Optimal Alignment |
| Arm Position | Fully extended but not locked |
| Foot Placement | Shoulder-width apart |
| Body Alignment | Chest squarely facing target |
| Dominant Eye Use | Line up sights using dominant eye naturally |
Situations Where It Excels
- Competitive shooting sports like IPSC or USPSA.
- Home defense scenarios where speed and vision are critical.
- Law enforcement training programs emphasizing dynamic movement and situational awareness.
Its versatility makes it a staple among trainers worldwide who seek effective techniques that balance simplicity with efficiency.
By understanding these aspects and incorporating them into regular practice sessions, shooters can maximize both accuracy and control using the popular isosceles technique—an enduring favorite among modern enthusiasts alike.
How to Choose the Right Shooting Stance for Your Style
Selecting a shooting stance is not a one-size-fits-all decision. The best stance for you depends on several factors, including your body mechanics, personal comfort, shooting environment, and intended purpose (e.g., competition, self-defense, or recreational shooting). This section will guide you through understanding how to choose the right stance that aligns with your unique style.
Factors to Consider When Choosing a Shooting Stance
- Some stances require more upper-body strength or core stability than others. For example:
- The Weaver stance involves tension between both arms and may feel tiring for shooters with less upper-body strength.
- The Isosceles stance relies on symmetrical weight distribution and may work better for those who prefer simplicity in their posture.
- Consider how well you can hold the position for extended periods without fatigue.
- Dynamic Situations (e.g., self-defense): A versatile stance like the Isosceles offers quick adaptability in high-pressure situations because of its straightforward alignment.
- Precision Shooting: Techniques such as the Chapman stance emphasize control and accuracy, making them suitable for competitions or target practice.
- Tactical Applications: If you anticipate shooting behind cover or at varying angles, a mobile option like the Weaver could be advantageous.
- Stand in front of a mirror or have an instructor observe your form.
- Note any strain in your shoulders, back, or wrists.
- Shooters coming from specific training programs might find one stance more familiar than another:
- Military-style training often emphasizes the Isosceles due to its alignment with modern tactics.
- Shooters trained decades ago might lean toward the Weaver due to its historical prevalence.
Practical Tips for Testing Each Stance
- Test all three stances (Isosceles, Weaver, Chapman) using an unloaded firearm or training tool in a controlled environment.
- Practice basic drills such as drawing from a holster and dry-firing while standing in each position.
- Track accuracy across multiple distances (short-range vs long-range).
- Pay attention to recoil management—does one stance allow better sight recovery?
- Transition between targets using each stance.
- Evaluate how stable and agile you feel when moving laterally or forward/backward.
Comparison Table: Key Features by Stance
| Feature | Isosceles | Weaver | Chapman |
| Arm Position | Arms fully extended symmetrically | Strong arm straight; support arm bent | Strong arm straight; support arm slightly bent |
| Recoil Control | Moderate | High | High |
| Mobility | High | Moderate | Moderate |
| Alignment | Shoulders square to target | Body bladed | Body slightly angled |
| Best For | Beginners & tactical shooters | Traditionalists & side-angle scenarios | Precision & long-term comfort |
Listening to Feedback from Practice
After testing various stances: – Evaluate feedback from instructors if applicable—they can spot subtle issues like improper grip alignment caused by your chosen position. – Pay attention to your performance metrics: Are you consistently hitting targets? Does one position make recovery between shots easier?
By tailoring your choice of shooting stance based on these considerations, you’ll build confidence in handling firearms effectively while ensuring safety and accuracy remain top priorities throughout any scenario.
How to Choose the Right Shooting Stance for Your Style
Selecting the ideal shooting stance is not a one-size-fits-all process. Each shooter is unique in terms of physical build, experience, and shooting goals. Choosing the stance that complements your style involves understanding your needs, experimenting with different techniques, and focusing on comfort and control. Below is a guide to help you determine which stance may be best suited to your preferences.
Assessing Your Goals and Shooting Context
Before diving into specific stances, consider these factors that influence what might work best for you: – Type of Shooting: Are you practicing for self-defense, competitive shooting, or recreational target practice? Each purpose may benefit from a different stance. – Environment: Indoor ranges typically allow for more formal stances like Isosceles or Weaver. In contrast, outdoor or tactical scenarios might call for adaptability. – Physical Comfort: Personal strength, flexibility, and any injuries can limit certain movements or postures.
Comparing Key Features of Each Stance
| Stance | Strengths | Potential Drawbacks |
| Isosceles | Symmetrical posture enhances stability; simple to learn; excellent recoil management | Can feel awkward for those with limited upper body strength |
| Weaver | Great for managing strong recoil; promotes an active, angled posture | Requires more practice to perfect alignment |
| Chapman | Combines Isosceles stability with Weaver’s recoil control; ergonomic arm positioning | May not suit shooters with weaker dominant-hand grip |
Practical Tips for Trying Out Styles
When experimenting with stances: 1. Start With Basics: Begin by mastering the fundamentals of each stance individually. 2. Use Dry Fire Practice: Practice without ammunition to focus entirely on form without external distractions. 3. Test Under Stress: Simulate real-world conditions by adding movement or timed drills once you’ve gained confidence in each position.
Adapting Based on Physical Build
No two shooters are identical. If you’re taller or have longer arms, Chapman may feel more natural due to its extended support hand placement. Conversely, shorter individuals might find the compact nature of Weaver more intuitive.
If possible, work with an experienced instructor who can provide personalized feedback based on how each stance suits your body mechanics.
Final Thoughts
The right shooting stance will ultimately depend on your personal goals and physical dynamics. Investing time in understanding and testing each technique will improve not only accuracy but also long-term confidence as a shooter.
GLOCK 45 G6 9MM 4.02″ 17-RD SEMI-AUTO PISTOL
The 6th Generation of Glock pistols delivers enhanced ergonomics for increased usability and comfort with a…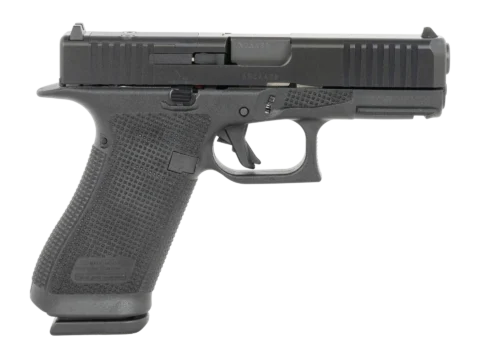
CMMG 30A0ED0-AB Zeroed Banshee Mk4 300 Blackout 30+1 6.50″ Black
CMMG 30A0ED0-AB Zeroed Banshee Mk4 300 Blackout 30+1 6.50" Black Nitride Threaded Barrel, Black Armor Cerakote…